The LPB Piso Wifi system provides internet access to their clientele.
You can pay a specific amount, such as 10 pesos, for a set duration like 3 hours. For those managing this system, setting these timer rates is essential.
Let’s get in the steps to set up LPB Piso Wifi Online Add Timer.
LPB Piso Wifi Online Add Timer
- Access the System: Start by logging in. Use the address “lpb piso wifi 10.0.0.1 admin” on your browser.
- Input your “LPB piso wifi login” credentials. If you forgot them, you might need to reset the “lpb piso wifi password.”
- Timer Rate Settings:
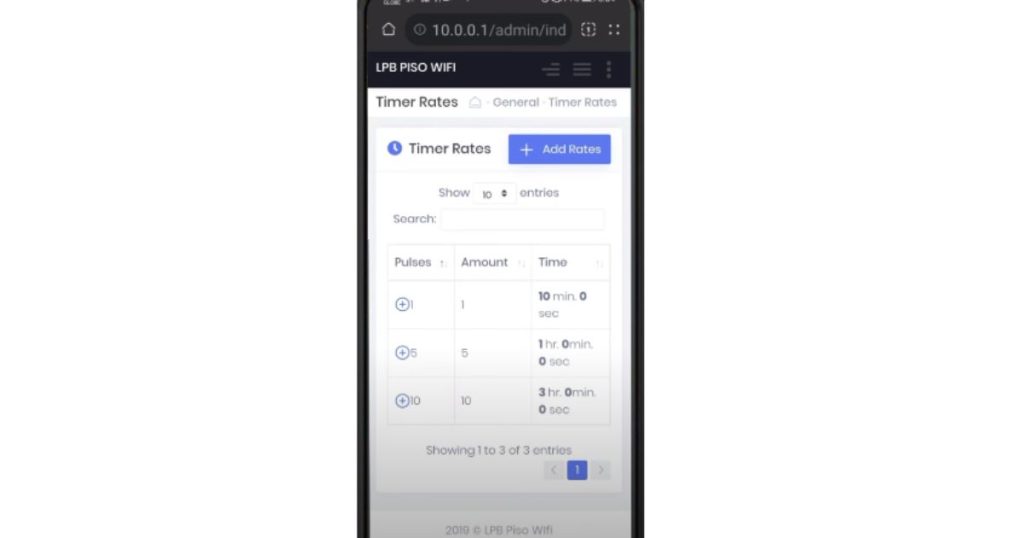
- Navigate to “Timer Rates” from the menu.
- Click the “Add Rates” button.
- Input the Number of Pesos and duration. For instance, to charge 10 pesos for 3 hours, you’d indicate “10” and then set the duration to “3 hours 0 minute 0 seconds.”
- Optionally, set an expiration date if you want the rate to be temporary.
- Confirm by clicking “Add.”
READ: LPB Piso Wifi Setup, Pause Time, Login, Admin Settings, and More
How Do I Pause Wifi Time in 10.0.0.1 Piso?
If the system for your Piso Wifi is set up such that the IP address 10.0.0.1 allows you to manage your internet time, then pausing and resuming your connection through this portal can be a feature.

To pause LPB WiFi time on a 10.0.0.1 Piso Wifi:
- Open a browser.
- Enter “10.0.0.1” in the address bar.
- Click “Pause Time”.
- To resume, revisit the portal and click “Resume Time”.
READ: How to Use Piso WiFi 10.0.0.1 Pause Time Machine
How to Add Timer Rates on LPB PISO WIFI
- Access the Admin Panel:
- Connect a computer or smartphone to the LPB PISO WIFI machine.
- Open a web browser and enter the default IP address for the LPB PISO WIFI, often something like
192.168.1.1or a similar format. - Login using the default credentials (often ‘admin’ for both username and password) or the credentials provided by the machine’s manufacturer.
- Navigate to Timer or Rate Settings:
- Once inside the admin panel, look for an option related to ‘Rates’, ‘Timer Settings’, ‘Pricing’, or something similar.
- Click on that option to open the timer rate settings.
- Add Your Rates:
- There should be an option to ‘Add Rate’ or ‘Create New Rate’. Click on it.
- Input the amount of money (e.g., 1 peso) and the corresponding time duration (e.g., 10 minutes).
- Some systems may allow you to set rates for different times of the day, allowing for peak and off-peak pricing.
- Save Changes:
- Once you’ve added your desired rates, there will be a ‘Save’ or ‘Confirm’ button. Click it to ensure your new rates are stored and implemented.
- The new rates should now be active and will apply to any future transactions.
- Logout:
- To ensure the security of the machine settings, always log in from the admin panel once you’re done making changes.
- Test the New Rates:
- It’s a good practice to test the new rates. Insert money and see if the time allocated matches your new settings.
READ: LPB Piso Wifi License Key
LPB Piso Wifi Online Add Timer Download and Activation
Downloads & Activation: Always be cautious about searching for “Lpb piso wifi online add timer download” or “.apk” files online.
They might not be genuine and could pose security risks. Instead, work with the official channels to get any necessary tools or updates. Check out the lpb piso 10.0.0.1 pause time app only from official platforms. As for “Lpb piso wifi online add timer activation,” always follow the official procedures to activate or set up any feature.
Summary – Piso Wifi Online Timer LPB
If you have questions or run into issues, it might be best to refer to the machine’s manual, contact the manufacturer, or seek assistance from the community (like the comments section of the video you mentioned).
FAQs
How do I add an online timer for LPB Piso Wifi?
Log in to the admin panel, find the “Online Timer” option, set the desired timer settings for online sessions, and save the changes.
Can I schedule specific times for internet access on LPB Piso Wifi?
Log in to the admin panel, navigate to “Schedule” or “Access Control,” set the desired time slots, and save the settings.
Is there a way to limit internet usage to a certain duration on LPB Piso Wifi?
In the admin panel, go to “Timer” or “Usage Limits,” specify the maximum session duration, and save the changes.
Can I use a mechanical timer for Piso Wi-Fi online add?
No, a mechanical timer cannot interface with the digital system. Use the built-in software features in the admin panel to manage timers and sessions.